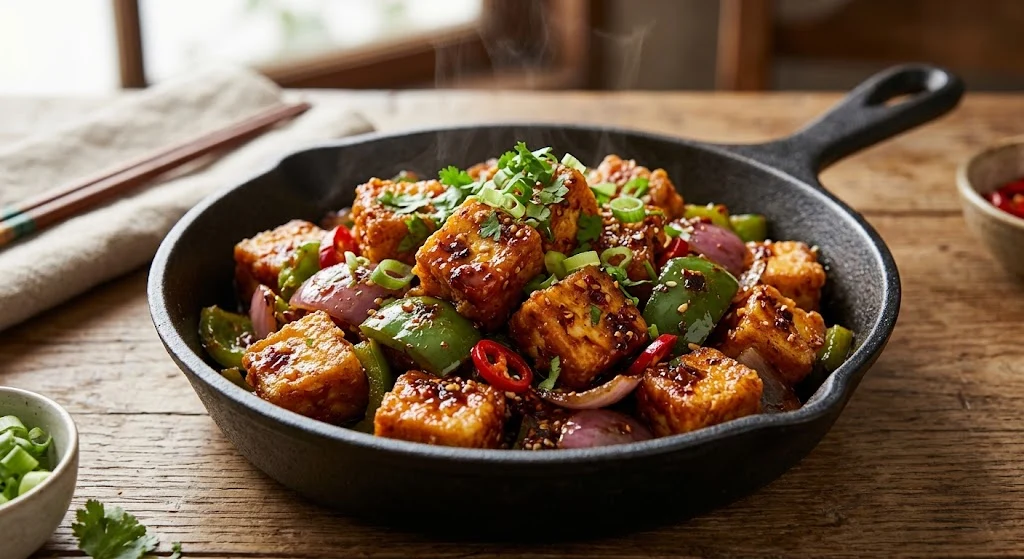
Make glossy, sweet-and-spicy chilli capsicum paneer with lightly crisp paneer, crunchy bell peppers, onions, fresh chilies, garlic, and ginger. The secret is combining the crispy paneer with the sauce only at the very end.
Chilli capsicum paneer combines crisp-edged paneer, crunchy bell peppers, onions, green chilies, garlic, and a glossy sweet-and-spicy sauce. This restaurant-style chilli paneer recipe makes a flavorful vegetarian appetizer or dinner in about 30 minutes.
The best part is the texture. Keep the vegetables slightly crisp, cook the paneer until lightly golden, and add it to the sauce at the very end. That keeps the coating from becoming soggy.
Quick Answer
Chilli capsicum paneer is an Indo-Chinese dish made with paneer, capsicum (bell pepper), onion, chilies, aromatics, and a savory chili-soy sauce. For the best texture, crisp the paneer separately and toss everything together just before serving.
Recipe at a Glance
| Detail | Information |
|---|---|
| Cuisine | Indo-Chinese |
| Course | Appetizer, side dish, or dinner |
| Prep time | 15 minutes |
| Cook time | 15 minutes |
| Total time | About 30 minutes |
| Servings | 4 |
| Difficulty | Easy to moderate |
| Main method | Stovetop |
| Best texture | Crisp paneer with crunchy vegetables |
| Dietary style | Vegetarian |
| Can be gluten-free | Yes, with gluten-free soy sauce or tamari |
What Is Chilli Capsicum Paneer?
Chilli paneer is a popular Indo-Chinese preparation built around paneer tossed with peppers, onions, chilies, aromatics, and a bold sauce. It is commonly served in dry, semi-dry, or gravy-style versions.
The word capsicum usually means bell pepper in Indian recipes. In the United States, you’ll usually see bell pepper on ingredient labels. Green bell pepper gives the dish a sharper flavor, while red, yellow, and orange peppers add sweetness.
Chilli Capsicum Paneer Recipe
Ingredients
For the Paneer
- 14 ounces paneer, cut into ¾-inch cubes
- ½ cup cornstarch
- ¼ teaspoon black pepper
- ¼ teaspoon salt
- 5–7 tablespoons water, added gradually
- 3 tablespoons neutral cooking oil
For the Stir-Fry
- 1 tablespoon neutral oil
- 1 medium onion, cut into chunky pieces
- 1 green bell pepper, cut into 1-inch pieces
- ½ red bell pepper, cut into 1-inch pieces
- 3 garlic cloves, finely chopped
- 1 teaspoon fresh ginger, finely chopped
- 1–2 green chilies, thinly sliced
- 2 scallions, whites and greens separated
For the Sauce
- 1½ tablespoons low-sodium soy sauce
- 1½ tablespoons chili sauce
- 1 tablespoon tomato ketchup
- 1 teaspoon rice vinegar
- 1 teaspoon sugar
- ¼ teaspoon black pepper
- ⅓ cup water
For the Slurry
- 1 teaspoon cornstarch
- 1 tablespoon cold water
For Finishing
- 2 scallions, sliced
- 1 tablespoon toasted sesame seeds, optional
- Extra sliced green chili, optional
How to Make Chilli Capsicum Paneer
Prepare the Paneer
Pat the paneer cubes completely dry with paper towels. Mix cornstarch, black pepper, and salt. Add water gradually until you have a thick, smooth coating that clings to the paneer.
- Add paneer to the bowl.
- Toss gently until every piece is coated.
- Avoid making the coating runny.
- Let the coated paneer stand for 2–3 minutes while the oil heats.
Shallow-Fry the Paneer
Heat a large skillet over medium-high heat and add the oil. Add paneer in a single layer, working in batches if necessary.
Cook until the coating is firm and lightly golden on several sides, turning carefully with tongs. Transfer to a paper-towel-lined plate.
Mix the Sauce
Whisk together soy sauce, chili sauce, ketchup, rice vinegar, sugar, black pepper, and water.
In another bowl, mix 1 teaspoon cornstarch with 1 tablespoon cold water. Keep both mixtures beside the stove because the stir-fry moves quickly.
Stir-Fry the Aromatics
Wipe out excess oil if necessary, leaving about 1 tablespoon. Heat over medium-high heat and add garlic, ginger, green chilies, and scallion whites. Stir-fry for about 30 seconds, just until fragrant.
Add the Onion and Capsicum
Add the onion and bell peppers. Stir-fry for about 2–3 minutes. They should soften slightly while retaining some bite.
This crisp-tender texture is one of the defining features of good chilli paneer.
Add the Sauce
Pour in the prepared sauce. Bring it to a gentle simmer and stir for 30–60 seconds.
Stir the cornstarch slurry again because starch settles quickly. Add it gradually while stirring. Stop when the sauce becomes glossy and thick enough to lightly coat the vegetables.
Add the Paneer Last
Add the fried paneer and toss everything together over high heat for about 30 seconds, just long enough to coat the paneer.
Turn off the heat immediately. Scatter over scallion greens and sesame seeds. Serve right away for the best contrast between crisp paneer and crunchy vegetables.
Dry, Semi-Dry, or Gravy Chilli Paneer?
| Style | Texture | Best For |
|---|---|---|
| Dry | Light sauce coating | Appetizer or party platter |
| Semi-dry | Glossy, spoonable coating | Dinner or appetizer |
| Gravy | Plenty of sauce | Rice or noodles |
Dry Version
Reduce sauce water to about 2 tablespoons and use only enough slurry to create a thin glaze. The finished paneer should look glossy rather than saucy.
Semi-Dry Version
Follow the main recipe. This gives you enough glossy sauce to coat the vegetables and paneer without turning the dish into gravy.
Gravy Version
Increase sauce water to about ¾ cup. Add slurry gradually until the gravy reaches your preferred consistency.
How to Keep Chilli Paneer Crispy
Crisp paneer is mostly a timing problem. Even a good coating becomes soft if it sits in wet sauce for too long.
- Dry the paneer before coating.
- Keep the coating thick enough to cling.
- Fry paneer in a single layer.
- Avoid overcrowding the pan.
- Keep the vegetables slightly crisp.
- Don’t make the sauce excessively thin.
- Add the paneer last.
- Toss for only about 30 seconds.
- Serve immediately.
Crisp the paneer separately, build the sauce separately, then combine them at the last moment.
Which Bell Peppers Are Best?
Green Bell Pepper
Sharper and slightly bitter, with a traditional savory character.
Red Bell Pepper
Sweeter and fruitier, giving the dish a softer pepper flavor.
Yellow or Orange
Mild and sweet, useful when you prefer a gentler pepper flavor.
For a colorful dinner-party dish, use green, red, and yellow bell peppers together. You don’t need all three—a large green bell pepper works perfectly well.
How Spicy Should Chilli Paneer Be?
The sauce should balance heat, sweetness, acidity, and salt. Adjust the chilies and chili sauce gradually because brands vary significantly in heat and salt.
Mild
- Use one mild green chili.
- Remove the seeds.
- Choose a mild chili sauce.
Medium
- Use one or two fresh green chilies.
- Keep some seeds.
- Use regular chili sauce.
Hot
- Add serrano or Thai chilies.
- Increase chili sauce gradually.
- Finish with fresh chilies.
The Best Paneer for This Recipe
Choose firm paneer that holds its shape when cut. Fresh or refrigerated paneer both work, although very soft paneer can break during coating and tossing.
If your paneer feels particularly firm, place the cubes in warm water for several minutes, then drain and pat them thoroughly dry before coating.
Air Fryer Chilli Paneer
An air fryer is useful when you want to reduce the amount of oil used for crisping the paneer.
- Pat the paneer dry.
- Coat it with the cornstarch mixture.
- Lightly spray or brush the pieces with oil.
- Arrange them with space between each cube.
- Air-fry at 390°F for about 8–12 minutes, turning halfway.
- Stop when the coating is firm and lightly golden.
- Prepare the sauce separately on the stovetop.
- Toss air-fried paneer into the finished sauce just before serving.
Oven Method
- Heat the oven to 425°F.
- Arrange coated paneer on a lightly oiled baking sheet.
- Leave space between the pieces.
- Lightly brush or spray with oil.
- Bake until firm and lightly golden, turning once.
- Prepare the sauce separately.
- Toss the paneer with sauce immediately before serving.
Gluten-Free and Dairy-Free Options
Gluten-Free Chilli Paneer
- Use certified gluten-free soy sauce or tamari.
- Check your chili sauce label.
- Check ketchup and other packaged sauces.
- Use cornstarch instead of wheat flour.
Dairy-Free Alternative
Traditional paneer is dairy-based. For a dairy-free version, use extra-firm tofu.
Press the tofu well, cube it, coat it with cornstarch, and crisp it using the same general method.
Important Label Check
Do not assume every soy sauce or chili sauce is gluten-free. Check the package label and cross-contact information when needed.
Easy Ingredient Substitutions
| If You Don’t Have | Try This |
|---|---|
| Rice vinegar | Small amount of distilled white vinegar, added gradually |
| Fresh green chilies | Sliced jalapeño or serrano |
| Red bell pepper | Green, yellow, or orange bell pepper |
| Low-sodium soy sauce | Regular soy sauce; reduce added salt |
| More sweetness | Extra ketchup or a small pinch of sugar |
| More tang | A few drops of rice vinegar after tasting |
| Gluten-free soy sauce | Gluten-free tamari |
Common Chilli Paneer Mistakes
The Paneer Turned Chewy
It was probably cooked too long or at excessive heat. Cook just until lightly golden and remove it from the pan.
The Coating Fell Off
The paneer may have been wet or the coating too thin. Pat paneer dry and use a coating thick enough to cling.
The Vegetables Became Mushy
Use higher heat and a shorter stir-fry. Bell peppers should retain some bite.
The Sauce Is Too Thick
Add a tablespoon or two of water and stir over low heat.
The Sauce Is Too Thin
Simmer briefly or add a small amount of cornstarch slurry.
The Dish Tastes Too Salty
Don’t add more soy sauce. Balance with water, vegetables, or unsalted paneer. A little sugar may soften perceived saltiness.
The Paneer Became Soggy
The most common cause is letting fried paneer sit in sauce. Keep the sauce concentrated and combine immediately before serving.
What to Serve With Chilli Capsicum Paneer
Dry or semi-dry chilli paneer works especially well as an appetizer or side dish. For a complete meal, serve it with:
- Steamed jasmine rice
- Vegetable fried rice
- Egg fried rice, if eggs fit your meal
- Hakka-style noodles
- Chow mein-style noodles
- Plain basmati rice
- Scallion rice
- Stir-fried vegetables
For a party, spoon the dry version onto a platter and finish with scallions, sesame seeds, and thinly sliced chilies. For dinner, choose the semi-dry or gravy version and serve it over rice.
Make-Ahead, Storage and Reheating
The best make-ahead strategy is to prepare the components separately.
- Cut vegetables.
- Mix sauce.
- Prepare cornstarch slurry.
- Coat paneer.
- Slice scallions.
Cook the paneer and vegetables close to serving time whenever possible. For leftovers, refrigerate the cooked dish promptly in a covered container.
For better texture, reheat paneer in a skillet or air fryer rather than microwaving it alone for a long time.
Can You Make Chilli Paneer for a Party?
Absolutely. The dry version is particularly easy to serve because guests can eat it without rice or noodles.
Party Strategy
- Cut the paneer and vegetables earlier.
- Mix the sauce ahead.
- Fry or air-fry the paneer in batches.
- Keep the sauce separate.
- Stir-fry vegetables shortly before serving.
- Toss paneer with sauce at the last moment.
- Garnish immediately before serving.
A Simple Flavor-Balance Guide
If the finished sauce doesn’t taste right, identify what is missing before adding more ingredients.
| If It Tastes… | Try… |
|---|---|
| Too salty | Add water and unsalted vegetables |
| Too sweet | Add a small splash of vinegar |
| Too sharp | Add a little sugar |
| Too bland | Add chili sauce or a small amount of soy sauce |
| Too spicy | Add more paneer and vegetables |
| Too thin | Use a little cornstarch slurry |
| Too thick | Add water gradually |
| Too flat | Add a small amount of vinegar and fresh chili |
Frequently Asked Questions
Is chilli capsicum paneer the same as chilli paneer?
Yes. Chilli capsicum paneer is essentially chilli paneer made with a noticeable amount of bell pepper, which is called capsicum in many Indian recipes. It typically combines paneer, peppers, onions, chilies, aromatics, and a savory sauce.
Can I make chilli paneer without deep-frying?
Yes. Shallow-frying, air-frying, and oven-baking all work. Shallow-frying gives a particularly good balance of crisp coating and tender paneer without requiring a large amount of oil.
Why is my chilli paneer not crispy?
Common causes include wet paneer, a thin coating, overcrowding, insufficient browning, or adding paneer to sauce too early. Keep the coating firm, cook in batches, and combine with sauce only at the end.
What is the difference between dry and gravy chilli paneer?
Dry chilli paneer has just enough sauce to coat the paneer and vegetables. Gravy chilli paneer contains substantially more sauce and works well with rice or noodles. Semi-dry sits between the two.
Can I use tofu instead of paneer?
Yes. Extra-firm tofu is a useful dairy-free substitute. Press it well before coating so excess moisture doesn’t interfere with crisping.
Can I make chilli paneer gluten-free?
Yes. Paneer and cornstarch can fit a gluten-free recipe, but packaged sauces need to be checked. Use gluten-free soy sauce or tamari and verify the chili sauce and other condiments.
How long does leftover chilli paneer last?
Store leftovers in the refrigerator at 40°F or below and use them within 3–4 days. Reheat leftovers to 165°F for safe serving.
Conclusion
This chilli capsicum paneer recipe is all about contrast: crisp paneer, crunchy bell peppers, fragrant garlic and ginger, fresh chilies, and a glossy sweet-tangy sauce. The most important technique is keeping the paneer separate until the final toss.
Choose the dry version for appetizers, the semi-dry version for an all-purpose dinner, or add more sauce for a rice-friendly gravy. Start with moderate heat, taste the sauce before seasoning, and adjust the balance to suit your table.
If you make it ahead, prepare the components separately and combine them just before serving. That simple step gives you the best chance of keeping the paneer crisp and the vegetables lively.
Read More :