
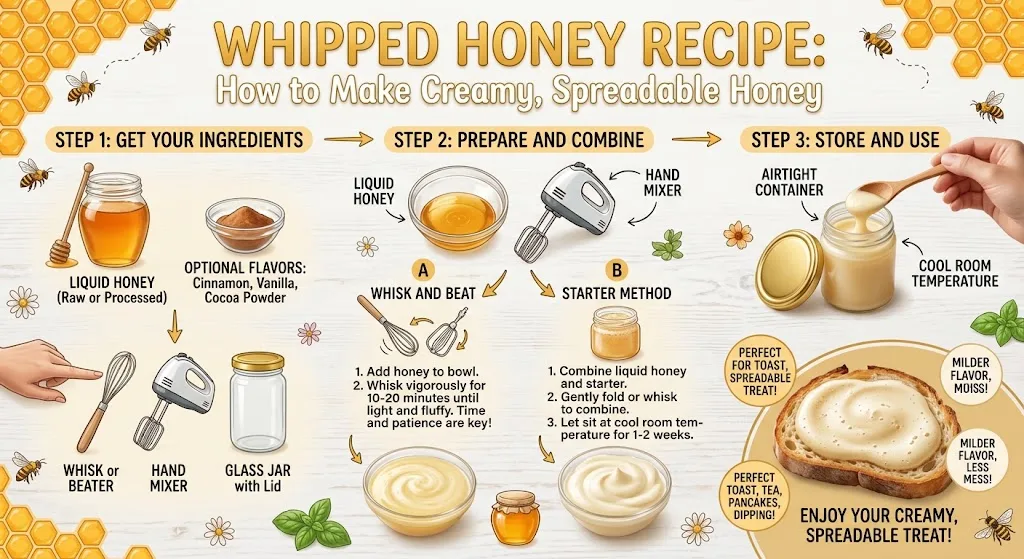
Turn ordinary honey into a thick, creamy, spreadable treat with just honey and an electric mixer. Learn the easiest method, how crystallized honey affects texture, how to fix graininess, and how to store it properly.
If you want a whipped honey recipe that turns ordinary honey into a thick, creamy spread, you only need honey and an electric mixer. The key is knowing which type of honey you have and what texture you want.
This homemade whipped honey is especially good on toast, biscuits, pancakes, waffles, yogurt, fruit, and cheese boards. Below, you’ll learn the easiest method, how crystallized honey changes the result, how to fix grainy honey, and how to store it properly.
To make whipped honey, beat 1 cup of honey with an electric mixer until it becomes lighter in color, thicker, and creamy. The exact mixing time varies, so use the texture and color as your main guides, not the clock.
For the smoothest, spreadable result, finely crystallized honey or a small amount of fine seed honey can help create a creamier texture.
Whipped Honey Recipe at a Glance
A simple one-ingredient honey spread you can make at home.
Ingredients
- 1 cup honey, preferably at room temperature
- Optional: 1–2 tablespoons finely crystallized honey for a denser, creamed-honey-style texture
Equipment
- Electric hand mixer or stand mixer
- Medium or large mixing bowl
- Rubber spatula
- Clean, dry airtight jar or container
Instructions
What Is Whipped Honey?
Whipped honey is honey processed into a thicker, lighter, more spreadable texture. Depending on the method, the texture comes from aeration, fine crystallization, or a combination of both.
The terminology can be confusing because whipped honey, creamed honey, and spun honey are often used interchangeably. However, they don’t always describe exactly the same process.
A mixer can incorporate air and make liquid honey look lighter and fluffier. Traditional creamed honey relies more heavily on controlling the size and formation of honey crystals. The result is usually dense, smooth, and spreadable rather than foamy.
Whipped Honey vs. Creamed Honey
The biggest difference is how the texture is created.
| Type | Starting Honey | Main Process | Typical Texture |
|---|---|---|---|
| Whipped honey | Usually liquid honey | Mechanical mixing | Light, thick, creamy |
| Creamed honey | Liquid plus fine seed honey or finely crystallized honey | Controlled crystallization | Dense, smooth, spreadable |
| Crystallized honey | Honey that naturally formed crystals | Natural crystallization | Can be coarse or fine |
| Whipped crystallized honey | Crystallized honey | Mixing and breaking down crystals | Thick and creamy |
If your goal is a quick homemade spread, use the basic whipped-honey method. If your honey is already crystallized, you can also use those crystals to help create a more stable, spreadable texture.
Ingredients for Whipped Honey
You don’t need a long ingredient list.
Basic Recipe
- 1 cup honey, preferably at room temperature
- Optional: 1 to 2 tablespoons finely crystallized honey if you want a denser, creamed-honey-style texture
For the simplest version, use only honey.
Mild honey such as clover honey works well when you want a neutral flavor. Wildflower, orange blossom, buckwheat, or other varietal honeys will give the finished spread a stronger floral character.
Equipment You Need
The recipe requires very little equipment.
- Electric hand mixer or stand mixer
- Medium or large mixing bowl
- Rubber spatula
- Clean airtight jar or container
A whisk attachment works well with a stand mixer. A hand mixer with standard beaters is also practical for a one-cup batch.
Keep the honey in the center of the bowl as much as possible. This helps the beaters work through the honey instead of simply pushing it around the sides.
How to Make Whipped Honey
Step 1: Bring the Honey to Room Temperature
Let cold honey warm naturally until it is easier to mix. You don’t need to heat it until it becomes runny. Room-temperature honey is easier to process and gives you better control over the texture.
Step 2: Add the Honey to the Bowl
Pour 1 cup of honey into a clean mixing bowl. If you’re using finely crystallized honey as a seed, add it now.
Step 3: Start Mixing Slowly
Begin on low speed for about 30 seconds. This reduces splashing and gives the mixer time to work the honey evenly. Increase to medium speed once the honey is moving smoothly.
Step 4: Keep Whipping
Continue mixing for about 10 minutes, then check the texture.
- Lighter in color
- Thicker
- Creamier
- Less transparent
- More spreadable
If it still looks like ordinary liquid honey, continue mixing in short intervals. Some batches may need 15 to 20 minutes or longer, depending on the honey, temperature, mixer, and starting texture.
Step 5: Check the Texture
Stop occasionally and scrape down the sides of the bowl. The finished honey should look pale, thick, and creamy rather than watery.
If you’re using crystallized honey, rub a tiny amount between clean fingers to check for obvious coarse crystals. A smooth texture is what you’re looking for.
Step 6: Transfer to a Jar
Use a rubber spatula to move the whipped honey into a clean, dry airtight container. It can be used immediately.
If the honey becomes softer after mixing, let it cool to room temperature before judging the final consistency.
How to Make Creamier Whipped Honey With Crystallized Honey
If you already have a jar of crystallized honey, don’t throw it away. Crystallized honey can be an excellent starting point for a creamy spread, especially when the crystals are naturally fine.
For a smoother homemade version, combine:
Fine-Crystal Honey Method
A useful variation when you want a denser, more traditional creamed-honey-style result.
Mix the liquid honey and finely crystallized honey together until the texture becomes smooth and uniform. The small crystals act as seed crystals, helping guide the formation of a finer texture.
Which Honey Is Best for Whipping?
Most pure honey can be used, but different varieties behave differently.
Clover Honey
Clover honey has a mild, familiar flavor. It’s a good choice for toast, biscuits, pancakes, and everyday breakfast use.
Wildflower Honey
Wildflower honey can have a deeper floral flavor. It’s especially good when the honey itself is meant to stand out.
Orange Blossom Honey
Orange blossom honey has a bright floral-citrus character that works well with yogurt, fruit, pastries, and cheese.
Buckwheat Honey
Buckwheat honey has a much stronger, darker flavor. Use it when you want a bold honey spread rather than a mild one.
Raw Honey
Raw honey can be used for homemade whipped honey. The final texture depends more on its starting condition, temperature, moisture, and crystal structure than on the word “raw” alone.
How Long Should You Whip Honey?
There is no single correct mixing time for every batch. A practical range is 10 to 20 minutes, but texture matters more than the timer.
Start checking after about 10 minutes.
- The color becomes paler.
- The honey becomes thicker.
- The surface looks creamy instead of glassy.
- The honey moves more slowly from the beaters.
- The finished spread holds its shape better.
Why Is My Whipped Honey Grainy?
Graininess usually comes from large honey crystals rather than a lack of mixing. Honey naturally crystallizes because some of its sugars form crystals over time. The size of those crystals affects how smooth the honey feels.
If Your Honey Is Slightly Grainy
Continue mixing and check it again.
If the Crystals Are Very Coarse
The finished texture may remain gritty even after extended mixing. A better approach is to use finer crystallized honey as the seed or combine the crystallized honey with liquid honey.
If Your Honey Becomes Too Soft
Allow it to cool to room temperature and reassess the texture. Avoid adding water to thin or loosen it.
Common Whipped Honey Problems and Fixes
| Problem | Likely Cause | Best Fix |
|---|---|---|
| Honey isn’t getting thicker | Cold honey or different starting characteristics | Bring it to room temperature and continue mixing. |
| Honey looks foamy | More air has been incorporated than desired | Continue briefly, then stop when the preferred texture is reached. |
| Large crystals remain | Starting crystals are too coarse | Use finer crystallized honey or fine seed honey. |
| Honey became runny | Temperature has softened the honey | Let it return to room temperature before reassessing. |
| Honey sticks to the bowl | Honey has moved toward the sides | Stop and scrape down the bowl with a rubber spatula. |
Best Ways to Use Whipped Honey
The thicker texture makes whipped honey especially useful where regular honey tends to run.
Breakfast
- Spread it on toast or sourdough
- Spoon it over pancakes
- Add it to waffles
- Serve it with biscuits
- Swirl it into Greek yogurt
- Pair it with fresh berries
- Spread it on English muffins
- Add a small spoonful to oatmeal
Snacks
- Pair it with apple or pear slices
- Spread it on crackers
- Serve it with peanut butter
- Add it to a simple snack board
Cheese Boards
Whipped honey works particularly well with salty or tangy cheeses.
- Brie
- Goat cheese
- Sharp cheddar
- Blue cheese
- Aged gouda
The creamy texture makes it easier to place a small spoonful beside cheese without creating a puddle on the board.
Desserts
- Vanilla ice cream
- Pound cake
- Cheesecake
- Baked apples
- Roasted pears
- Shortbread
- Fresh fruit
Easy Whipped Honey Flavor Variations
Once you have the plain version working, you can experiment with flavor.
| Variation | Flavor Profile | Great With | Storage Note |
|---|---|---|---|
| Cinnamon Honey | Warm and sweet | Toast, biscuits, oatmeal, pancakes | Dry spice is storage-friendly |
| Vanilla Honey | Sweet and dessert-like | Ice cream, pastries, breakfast foods | Use vanilla extract sparingly |
| Ginger Honey | Warm and spicy | Toast, pastries, oatmeal | Dry ginger is preferable |
| Cardamom Honey | Floral and citrusy | Pastries, yogurt, fruit | Ground spice works well |
| Chili Honey | Sweet and spicy | Cheese, crackers, savory snacks | Use dried chili for easier storage |
| Salted Honey | Balanced sweet-salty flavor | Cheese, bread, warm biscuits | Fine salt is easy to incorporate |
How to Store Whipped Honey
Transfer the finished honey to a clean, dry, airtight container.
For plain honey, a cool, dry place at room temperature is generally the best choice for maintaining a spreadable texture.
- Keep it away from direct sunlight.
- Keep it away from excess heat.
- Keep it away from steam.
- Do not introduce water.
- Always use a clean, dry spoon when serving.
For the best quality, make flavored batches in small amounts and follow appropriate refrigerated storage when the added ingredients require it.
Is Whipped Honey Safe for Babies?
Honey can contain spores that may cause infant botulism in babies under one year old. Cooking or whipping honey does not make it appropriate for infants.
For everyone else, use normal food-handling practices and keep flavored honey separate from ingredients that may introduce moisture or contamination.
Recipe Variations and Serving Ideas
- Breakfast: Spread over warm toast with sliced strawberries.
- Brunch: Serve with biscuits, croissants, or waffles.
- Snack: Pair with apple slices and nut butter.
- Cheese board: Serve beside goat cheese and sharp cheddar.
- Dessert: Spoon over vanilla ice cream.
- Baking: Use as a finishing spread for muffins and quick breads.
- Holiday table: Put a small jar beside warm dinner rolls.
- Gift idea: Fill small clean jars with plain or dry-spiced whipped honey.
Frequently Asked Questions About Whipped Honey
Can I make whipped honey with regular liquid honey?
Yes. Liquid honey can be beaten with an electric mixer until it becomes lighter and thicker. For a denser, more stable creamed-honey-style texture, finely crystallized honey or seed honey can be useful.
Is whipped honey the same as creamed honey?
Not always. The names are often used interchangeably, but the processes can differ. Whipped honey recipes may emphasize aeration, while traditional creamed honey focuses on controlled fine crystallization.
Can I whip crystallized honey?
Yes. Crystallized honey can be used directly, especially when its crystals are fine. If the crystals are large and gritty, combine it with liquid honey and use finely crystallized honey as the seed for a smoother result.
Why did my whipped honey become grainy?
The most likely reason is coarse sugar crystals in the starting honey. More mixing doesn’t always eliminate large crystals. Starting with finely crystallized honey gives you a better chance of achieving a smooth texture.
How long does whipped honey take to make?
Plan on roughly 10 to 20 minutes of mixing, although the exact time varies. Stop when the honey becomes lighter, thicker, creamy, and spreadable rather than relying on the timer alone.
Can I flavor whipped honey?
Yes. Cinnamon, ginger, cardamom, vanilla, chili, and a small amount of salt are useful options. For easier storage, dry spices are preferable to fresh, moisture-rich ingredients.
Do I need to refrigerate whipped honey?
Plain whipped honey generally does not need refrigeration. Store it sealed in a clean, dry container at room temperature in a cool location. Refrigeration can make honey firmer. Flavored versions containing moist ingredients are different and may require refrigeration.
Conclusion: Make Easy Homemade Whipped Honey
This whipped honey recipe turns a simple jar of honey into a thick, creamy spread with very little work. Start with 1 cup of honey, use an electric mixer, and judge the finished texture by its color, thickness, and smoothness.
If you want the lightest homemade version, start with liquid honey. If you want a more traditional creamed honey texture, work with finely crystallized honey or a small amount of seed honey. Once the plain version is right, try cinnamon, cardamom, or another dry spice for a personalized spread.
Make the basic batch first, then serve it with warm toast, biscuits, pancakes, fruit, or a cheese board.



16 thoughts on “Whipped Honey Recipe: How to Make Creamy, Spreadable Honey”