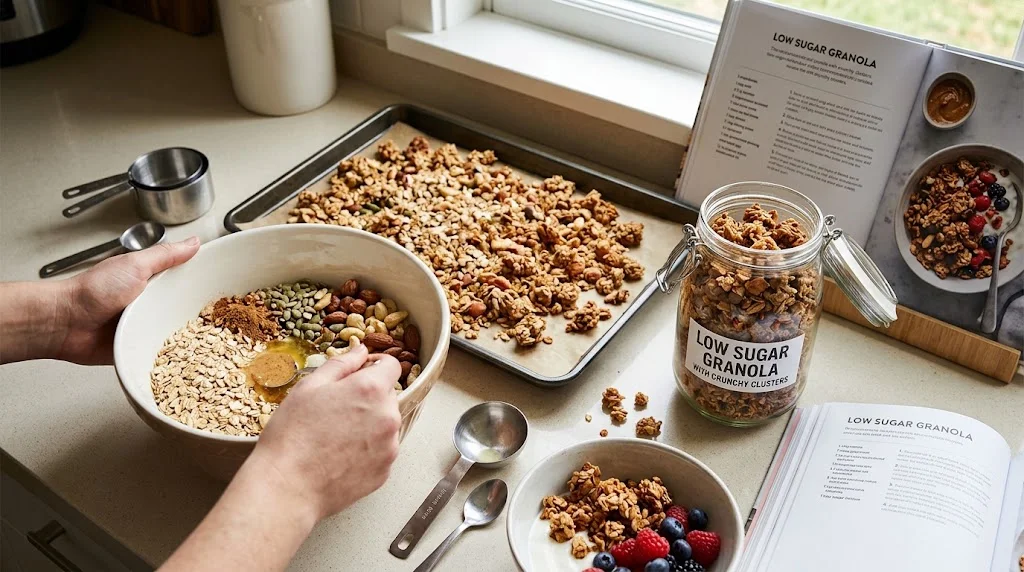
Make crunchy homemade granola without loading it with syrup. This low sugar granola recipe combines old-fashioned rolled oats, almonds, pumpkin seeds, almond butter, cinnamon, vanilla, and a small amount of maple syrup for crisp clusters and toasted flavor.
Quick Answer
This low sugar granola recipe makes about 6 cups of lightly sweet, crunchy granola. Bake at 325°F for 25–30 minutes, then let it cool completely before breaking it into clusters.
Based on the ingredient quantities below, the recipe provides approximately 1.1 grams of added sugar per ¼-cup serving. Maple syrup counts as an added sugar under FDA labeling guidance.
Low Sugar Granola Recipe at a Glance
Estimated per ¼ cup: 95 calories, 9g carbohydrates, 3.5g protein, 5.5g fat, 1.7g fiber, and 1.3g total sugar. Added sugar is approximately 1.1g per serving. Values are estimates and can vary by brand and substitutions.
Classic Low Sugar Granola
Crunchy, lightly sweet, nutty and easy to customize.
Ingredients
- 3 cups old-fashioned rolled oats
- ½ cup raw or unsalted almonds, roughly chopped
- ½ cup raw pumpkin seeds
- 2 tablespoons natural almond butter
- 2 tablespoons pure maple syrup
- 2 tablespoons neutral oil, such as avocado or light olive oil
- 1 teaspoon ground cinnamon
- 1 teaspoon vanilla extract
- ¼ teaspoon fine salt
- Optional: 2 tablespoons unsweetened coconut flakes
- Optional: ¼ cup unsweetened dried fruit, added after baking
Instructions
- Heat the oven. Set the oven to 325°F and line a large rimmed baking sheet with parchment paper.
- Mix the dry ingredients. Combine the oats, almonds, pumpkin seeds, cinnamon, and salt in a large bowl.
- Prepare the binder. Gently warm the almond butter, maple syrup, and oil until smooth and easy to stir.
- Add vanilla. Remove the wet mixture from the heat and stir in the vanilla.
- Coat the oats. Pour the wet mixture over the dry ingredients and stir until evenly coated.
- Spread evenly. Transfer the mixture to the lined baking sheet and spread it into an even layer.
- Press firmly. Use the back of a spatula to compact the mixture if you want large clusters.
- Bake. Bake for 25–30 minutes, until golden and toasted.
- Don’t over-stir. Leave the granola mostly undisturbed during baking for larger clusters.
- Cool completely. Leave the granola on the baking sheet until fully cool and crisp.
- Break into clusters. Use your hands to break the cooled sheet into pieces.
- Add extras. Fold in dried fruit or chocolate only after the granola has cooled.
Granola becomes noticeably firmer as it cools. Don’t judge the final crunch while it is still warm.
Why Old-Fashioned Oats Work Best
Use old-fashioned rolled oats, sometimes labeled large-flake oats. They hold their shape better during baking and create a more substantial crunchy texture than quick or instant oats.
Quick oats can become finer and softer during baking, making them less ideal when your goal is chunky, crisp granola.
How to Get Big Crunchy Granola Clusters
Large clusters depend on moisture, compression, and handling. You don’t need a large amount of syrup to create them; technique becomes more important when the recipe contains less sweetener.
- Press the mixture firmly before baking.
- Use old-fashioned rolled oats rather than instant oats.
- Spread the mixture in an even layer.
- Avoid piling the granola too thickly.
- Don’t stir frequently if large clusters are your goal.
- Bake until the center looks dry rather than wet.
- Remove the pan when the granola is golden and toasted, not dark brown.
- Cool completely before breaking it apart.
- Break the cooled sheet into large pieces.
- Store only after the granola has completely cooled.
For loose granola, stir once or twice during baking. For large clusters, press the mixture down firmly and leave it alone.
Low Sugar vs. No Added Sugar Granola
Low sugar and no added sugar are not interchangeable terms. This recipe uses a small amount of maple syrup, so it is a low-added-sugar option rather than a no-added-sugar recipe.
| Version | Sweetener or Binder | Expected Result |
|---|---|---|
| Low sugar | Small amount of maple syrup | Crisp and lightly sweet |
| No added sugar | Ripe banana or unsweetened applesauce | Softer, fruitier flavor |
| Maple granola | Maple syrup | Toasty, caramel-like flavor |
| Sugar-free style | Requires careful formulation and labeling | Not interchangeable with “no added sugar” |
If you’re publishing or packaging food commercially, avoid using “sugar-free” casually. That term has specific regulatory implications and is different from simply reducing the amount of sweetener in a recipe.
How Much Sugar Is in This Granola?
The exact amount depends on your ingredients, but this recipe contains only a small amount of maple syrup compared with many sweeter granolas.
Using 2 tablespoons of maple syrup across roughly 24 quarter-cup servings, the added sugar contribution is approximately 1.1 grams per serving. Naturally occurring sugars from other ingredients are separate from added sugar.
For the lowest-sugar serving, pair the granola with plain yogurt and fresh berries instead of sweetened yogurt, flavored milk, or sugary fruit sauces.
Easy Granola Substitutions
For the Nuts & Seeds
- Almonds → pecans
- Almonds → sunflower seeds for a nut-free version
- Pumpkin seeds → chopped walnuts
- Add unsweetened coconut for more toasted texture
For Flavor & Binder
- Almond butter → sunflower seed butter
- Avocado oil → canola or another neutral oil
- Neutral oil → coconut oil
- Cinnamon → pumpkin-pie spice
- Add orange zest for brightness
Use pure maple syrup rather than pancake syrup. Avoid making several wet substitutions at once because changing the oil, sweetener, nut butter, and fruit together can significantly change moisture, binding, and baking time.
No-Added-Sugar Granola With Banana
If you want granola without added sugar, ripe banana provides natural sweetness and moisture. The resulting granola will generally have a softer, fruitier texture than the maple version.
Simple Banana Variation
- Mash 1 very ripe banana until smooth.
- Mix it with 2 tablespoons almond butter and 2 tablespoons neutral oil.
- Combine with the same 3 cups of oats and 1 cup of nuts or seeds.
- Add cinnamon and vanilla.
- Spread into a thin layer.
- Bake at 325°F until dry and golden.
- Cool completely before breaking into pieces.
Because banana adds moisture, don’t remove the granola simply because the edges look browned. Check that the center also looks dry.
Applesauce Granola
Unsweetened applesauce adds mild apple flavor and can replace part of the sweetener. It works particularly well with cinnamon, pecans, walnuts, and pumpkin seeds.
- Use unsweetened applesauce.
- Combine it with oats, nuts, seeds, cinnamon, and vanilla.
- Add a small amount of maple syrup if desired.
- Add chopped dried apple after baking.
- Bake until the center looks dry.
- Cool completely before breaking apart.
- Store in an airtight container once fully cooled.
Don’t use sweetened applesauce if your goal is to keep added sugar low.
Nut-Free Low Sugar Granola
You can make crunchy granola without almonds, walnuts, pecans, or other tree nuts. Seeds provide plenty of texture, while sunflower seed butter can replace almond butter as the binder.
- ½ cup pumpkin seeds
- ½ cup sunflower seeds
- Sunflower seed butter instead of almond butter
- Optional chia seeds
- Optional ground flaxseed
- Optional sesame seeds if appropriate for your dietary needs
“Nut-free” does not automatically mean safe for every person with a food allergy. Packaged oats, seeds, chocolate, coconut, and other ingredients can be processed in facilities that handle allergens. Check labels and cross-contact statements when preparing food for someone with a serious allergy.
Vegan and Gluten-Free Options
Vegan
- Use pure maple syrup.
- Avoid honey.
- Check nut butter labels.
- Choose dairy-free chocolate if adding chocolate.
Gluten-Free
- Use certified gluten-free rolled oats.
- Check chocolate and dried-fruit labels.
- Prevent wheat cross-contact when necessary.
The basic recipe already contains no dairy. Serve it with unsweetened coconut, almond, soy, or oat yogurt for a dairy-free breakfast.
Higher-Protein Low Sugar Granola
Nuts and seeds contribute protein, but granola should not automatically be described as “high-protein” without checking the actual nutrition.
This recipe provides an estimated 3.5 grams of protein per ¼-cup serving. For a higher-protein breakfast, use granola as a topping rather than relying on it as the primary protein source.
- Serve it over plain Greek yogurt.
- Add pumpkin seeds or hemp hearts.
- Use peanut or almond butter.
- Use sunflower seed butter for a nut-free version.
- Pair it with cottage cheese and fruit.
- Add a spoonful to overnight oats.
One of the simplest upgrades is the serving combination: low sugar granola + plain Greek yogurt + fresh berries.
Chocolate Coconut Low Sugar Granola
Unsweetened cocoa powder adds chocolate flavor without requiring much extra sugar. Add chocolate pieces after baking so they remain distinct instead of melting into the oats.
- 1 tablespoon unsweetened cocoa powder
- ¼ cup unsweetened coconut flakes
- 2 tablespoons chopped dark chocolate or low-sugar chocolate chips
- Optional pinch of espresso powder
Mix the cocoa and coconut with the dry ingredients before baking. Once the granola has cooled completely, fold in the chocolate.
Fall Apple-Pumpkin Granola
For a fall variation, combine plain pumpkin puree with cinnamon, ginger, pecans, and dried apple. Use plain pumpkin puree rather than pumpkin pie filling, which can contain additional ingredients and may be sweetened.
- Add pumpkin puree to the wet ingredients.
- Use pecans or pumpkin seeds.
- Add cinnamon and ground ginger.
- Add a small pinch of nutmeg.
- Keep maple syrup modest.
- Bake until the center looks dry.
- Add dried apple after cooling.
- Cool completely before storing.
Pumpkin adds moisture, so this variation will generally be softer than the basic granola.
How to Choose Your Granola Texture
| Texture Goal | Best Technique |
|---|---|
| Loose and crisp | Stir once or twice while baking |
| Medium clusters | Press firmly and stir only once |
| Large clusters | Press firmly and avoid stirring |
| Extra crisp | Bake until fully dry and cool completely |
| Softer clusters | Use banana or applesauce |
| More toasted | Extend baking slightly while watching the nuts |
Hot granola is naturally softer than cooled granola. Give it enough time to firm up before deciding whether it needs additional baking.
How to Serve Low Sugar Granola
For a balanced breakfast, use granola as a crunchy topping rather than treating it as the entire meal.
- Spoon it over plain Greek yogurt.
- Add fresh strawberries or blueberries.
- Layer it into a breakfast parfait.
- Serve it with unsweetened milk.
- Sprinkle it over overnight oats.
- Add it to a smoothie bowl.
- Use it over baked apples.
- Pair it with cottage cheese and berries.
- Sprinkle a small amount over chia pudding.
- Pack a portion for a crunchy snack.
For the best texture, add granola immediately before eating when serving it with wet ingredients.
Storage, Freezing & Keeping Granola Crunchy
Allow homemade granola to cool completely before storing it. Sealing warm granola can trap moisture, which softens the clusters.
Storage Tips
- Cool completely before sealing.
- Use a clean, dry airtight container.
- Keep it away from heat and steam.
- Don’t add fresh fruit to the storage container.
- Add dried fruit after baking and cooling.
- Use a clean spoon each time.
Freezing
- Freeze fully cooled granola in a sealed freezer bag or container.
- Thaw at room temperature.
- Keep the container sealed during thawing to reduce condensation.
- Re-crisp softened granola briefly in a low oven if needed.
- Cool again before storing.
Granola containing fresh fruit, pumpkin puree, applesauce, or other high-moisture additions needs more caution than a dry oat-and-seed mixture. Store these variations according to the moisture and ingredients used rather than assuming they have the same shelf life as dry granola.
Common Granola Problems & Fixes
Why is my granola soft?
Usually there is too much moisture or not enough drying time. Spread it evenly and bake until the center looks dry. Remember that it firms as it cools.
Why didn’t I get clusters?
The mixture may have been stirred too often or wasn’t pressed firmly enough. Compact the mixture and leave it mostly undisturbed.
Why did my granola burn?
Nuts and coconut can brown quickly. Use the middle rack and watch the final minutes closely.
Why is my granola too sweet?
Reduce the maple syrup rather than replacing it with another concentrated sweetener. You can also rebalance a batch with more oats and seeds.
Why does my granola taste bland?
Increase flavor with cinnamon, vanilla, toasted nuts, salt, cocoa, citrus zest, or ginger rather than simply adding more sweetener.
Why is my granola chewy?
Chewiness usually indicates retained moisture. Spread the granola more thinly and continue baking until the center looks dry.
Low Sugar Granola Tips That Matter Most
- Use old-fashioned rolled oats for sturdy clusters.
- Measure wet ingredients accurately.
- Don’t overdo the maple syrup.
- Press the granola firmly for larger clusters.
- Don’t stir constantly during baking.
- Watch nuts and coconut carefully because they can burn before the oats.
- Cool completely before breaking the granola apart.
- Add chocolate after cooling for distinct chocolate pieces.
- Add dried fruit after baking for better texture.
- Store only after the granola has cooled completely.
Nutrition & Serving Size
Granola can be lower in sugar without being a low-calorie food. Oats, nuts, seeds, nut butter, and oil are concentrated ingredients, so serving size still matters.
For this recipe, ¼ cup is a practical starting serving.
| Nutrient | Estimated Amount per ¼ Cup |
|---|---|
| Calories | 95 |
| Carbohydrates | 9 g |
| Protein | 3.5 g |
| Fat | 5.5 g |
| Fiber | 1.7 g |
| Total sugar | 1.3 g |
| Added sugar | 1.1 g |
| Sodium | About 25 mg |
These numbers are estimates, not laboratory analysis. Brand differences, ingredient substitutions, and actual serving sizes can change the final values.
Frequently Asked Questions
Is maple syrup considered added sugar?
Yes. FDA guidance includes sugars from syrups and honey within the definition of added sugars. Therefore, granola made with maple syrup can be low in added sugar but is not a no-added-sugar recipe.
Can I make this granola without maple syrup?
Yes. Use a suitable no-added-sugar binder such as mashed ripe banana or unsweetened applesauce. The result will generally be less crisp and less caramelized because these ingredients contain more moisture.
Can I reduce the maple syrup even more?
Yes, but the texture will change. Less syrup means less binding, so the granola may form smaller clusters and taste less sweet.
What oats are best for homemade granola?
Old-fashioned rolled oats are the best general choice for crunchy granola because they hold their shape during baking and provide substantial texture.
How do I make granola crunchy without adding more sugar?
Control the wet ingredients, spread the granola evenly, bake until dry, and cool it completely. Pressing the mixture before baking also helps create firm clusters.
Can I make this recipe nut-free?
Yes. Replace the almonds and almond butter with sunflower seeds and sunflower seed butter. For serious allergies, check packaged ingredients for cross-contact information.
Can I make it gluten-free?
Yes. Use certified gluten-free rolled oats and check packaged ingredients such as chocolate, dried fruit, and seed butters.
How long does homemade granola last?
A dry batch can generally maintain good quality for several weeks when completely cooled and stored airtight in a cool, dry place. Moist variations require different storage considerations.
Can I freeze homemade granola?
Yes. Cool it completely, seal it in a freezer-safe container or bag, and thaw it at room temperature. Keeping the container sealed while thawing helps reduce condensation.
Final Thoughts
This low sugar granola recipe focuses on what homemade granola does best: crunch, toasted flavor, useful clusters, and controlled sweetness without relying on a large amount of syrup.
Start with the basic oat, almond, and pumpkin-seed version, then adjust the texture to your preference. For a no-added-sugar variation, try banana or unsweetened applesauce. For a higher-protein breakfast, serve a small portion with plain Greek yogurt and fresh fruit.
The most important step is simple: let the granola cool completely before breaking it apart. That’s when the crisp texture and clusters fully develop.
Read More :